Saturday, December 28, 2013

FUHS-ER Taco Chex Mix

Everyone loves home-made chex mix. This version? Even better. Spicy and flavorful... You'll probably eat far too much in one sitting, BUT you won't regret it...cause it's delicious. 

This recipe came from my Aunt Shelly and it's my brother's favorite. Every Christmas, he gets it as a gift in a huge ice cream pail. And every Christmas, I eat about half of it (whoops). 

This recipe is quick and easy and I promise you, everyone will love it. You'll probably never make the same old regular Chex Mix recipe again. 


Ingredients: 
  • 12 tbsp. butter
  • (2) pkgs. taco seasoning
  • 2 tbsp. Worcestershire sauce
  • 2 tsp. Tabasco sauce
  • 1 box Rice Chex
  • 2 c. dry roasted peanuts
  • 2 c. Cheez-Its
  • 2 c. Oyster crackers

Directions:
  1. Preheat oven to 250 degrees.
  2. In roasting pan, mix Rice Chex, dry roasted peanuts, Cheez-Its, and Oyster crackers.
  3. In saucepan, melt butter. Mix in taco seasoning, Worcestershire sauce, and Tabasco sauce.
  4. Pour sauce mixture over cereal and cracker mix. Mix carefully with spatula.
  5. Place in oven and bake for 1 hour - mixing every 15 minutes.
  6. After Chex Mix is through baking, pour onto wax paper and allow to cool completely before storing.

The Perfect Cut-Outs

Sometimes the best Christmas cookies are the simple cut-out sugar cookies that are doused in creamy frosting... You know, those ones that remind you of those cake cookies you buy in the grocery store that have that thick layer of frosting on top? That's what these taste like. I DO think I've found the perfect recipe.

I found this recipe on Allrecipes.com...my go to. The reason why these cookies are so great is because the dough is easy to work with when rolling & cutting out and the frosting hardens up just enough so that you can store/present these cookies without them sticking together. Zinger. 


And what's even better...is the fact that these cookies are so soft...and the frosting (though the outside hardens up just enough) is still soft and creamy. 

So...make these suckers...cause they are good!

Ingredients:

Cookies: 

  • 3/4 butter flavored shortening
  • 1 c. sugar
  • 2 eggs
  • 1 tbsp. milk
  • 1 tsp. vanilla extract
  • 2-1/2 c. flour
  • 1 tsp. baking powder
  • 1 tsp. salt
Frosting:

  • 1 tbsp. butter
  • 1 tsp. almond extract
  • 2-1/2 c. powdered sugar
  • 3 tbsp. milk
  • food coloring (optional)

Directions:

  1. Preheat oven to 400 degrees.
  2. In large bowl, cream together shortening and sugar until smooth. Add eggs, one at a time. 
  3. Add milk and vanilla. 
  4. In separate bowl, mix together flour, baking powder, and salt. Mix into creamed mixture. 
  5. On lightly floured surface, roll out dough to about 1/4" thick with floured rolling pin. *Note: If necessary, work more flour into the dough to avoid sticking to work surface or rolling pin.
  6. Cut into desired shapes with cookie cutters and place on parchment-lined cookie sheets. 
  7. Bake for 6 to 8 minutes in preheated oven. Remove cookies from baking sheets to cool on wire racks. Cool completely before frosting. 
  8. In small bowl, beat butter, almond extract, and powdered sugar until smooth. 
  9. Add milk 1 tablespoon at a time until frosting reaches desired consistency. 
  10. Frost and decorate cooled cookies. Allow cookies to harden on cookie sheets or waxed paper.

Wednesday, November 27, 2013

Whipped Pumpkin Cheesecake Cups

My family is a big fan of anything containing Cool Whip, cream cheese, and a crumby crust. So here it is, a recipe that I actually have no idea where I found it. BUT, it contains all these things, plus pumpkin. YUM?

I also love Biscoff Cookies. You know...the little cookies you usually get on an airplane with your shot of pop? The ones you think are going to taste like cardboard, but end up being surprisingly delicious? Those are the ones...and also the base of these dessert cups. YUM again.

I thought these trifles would make a great alternative choice to the usual Thanksgiving desserts (pie) and my usual go-to desserts for any occasion (cupcakes). 

This recipe yields about 6-7 cups...so I doubled it and made 12. Below is the recipe for the single batch.


Ingredients:

  • 12 Biscoff Cookies, crushed into crumbs
  • 1 tbsp. unsalted butter, melted
  • 8 oz. cream cheese, softened
  • 1 c. pure pumpkin puree
  • 1 tsp. vanilla extract
  • 1/2 c. sugar
  • 2 tsp. pumpkin pie spice
  • 1 large tub (12 oz.) Cool Whip, thawed (divided)
  • 6-7 plastic cocktail cups

Directions:
  1. In bowl, combine Biscoff Cookie crumbs and melted butter. Divide crumbs into cocktail cups. Use extra cocktail cup to press crumbs evenly into the bottom of each cup.
  2. In separate bowl, beat cream cheese until smooth. Add pumpkin, vanilla, sugar, and pumpkin pie spice. Beat until well combined and creamy.
  3. Gently fold in half of the tub of Cool Whip, 
  4. Divide pumpkin mixture into cocktail cups.
  5. Pipe or spoon remaining Cool Whip on top of the pumpkin layer. 
  6. Refrigerate until ready to serve.

[Easy as the Can] Cranberry Sauce

Okay, I love cranberry sauce from the can just as much as the next person...but this recipe is just as delicious and almost as easy as the jello-y can in all its deliciousness (I'm serious...I actually DO love the canned kind.) Three ingredients. Easy.

My dad still insists on having the canned stuff...next to the real stuff.  And he eats both. Whatta guy. 


Ingredients:
  • 12 oz. bag of cranberries
  • 1/4 c. + 2 tbsp. orange juice
  • 1 c. + 2 tbsp. sugar

Directions
  1. Microwave cranberries and juice (covered) for 6-8 minutes, stopping to stir about once or twice. 
  2. Add sugar and mix. 
  3. Recover and let stand. 
  4. Cool and then refrigerate. 

Secret Stuffing

So, I don't have a picture up yet for this recipe, since I'm only done with part one, but believe you me... I've made this stuffing before and it is the bees knees. I kid you not, I loved stuffing before the recipe came along, but this is stuffing on a whole new level. YES, you probably think I am over-exaggerating, but I'm telling you...this will be the best stuffing you've ever tasted.

Curtis's mom's Aunt Carolyn makes this for the holidays and Curtis was always raaaving about this stuff. I think the first time I had a holiday meal with the Ryan family, Curtis immediately took me to the stuffing pan, that's how good it is. Consider yourself luck that I am sharing this recipe with you. 

So you need to start this a day in advance, and I'm hoping someone reads this in time to make it for their Thanksgiving meal tomorrow. You can mess with your fancy-pants stuffing recipes all you want, but I'm gonna enjoy the good stuff.

I can't even tell you how excited I am to eat this in 24 hours.

Ingredients:
  • 12 chicken legs
  • 1 medium onion (chopped)
  • 2-3 stalks celery (chopped)
  • 3 bags Brownberry Onion/Sage Dry Bread Mix
  • 1 tsp. poultry seasoning
  • 3 cans cream of chicken (I buy reduced fat/sodium)
  • Salt & pepper to taste

Directions:
  1. DAY BEFORE: boil chicken legs in pot of water to cover. Add onion and celery and simmer until chicken is tender and falls off the bone (about 3 hours).
  2. Remove chicken meat from legs and return to stock (should be about 8 c. total - if you are short some liquid, add some chicken broth to the mix). Refrigerate stock overnight.
  3. DAY OF: reheat stock, add poultry seasoning and add salt and pepper to taste.
  4. Add cream of chicken and stir until mixed in. Pour over bread mix in extra large foil pan.
  5. Cover with tin foil and bake at 350 degrees for 1 hour.

Monday, November 11, 2013

Coconut Chicken Curry & Naan

When I was in Paris a few summers ago, one of my favorite things I had there was Indian food. Weird right? Well, I really had never, ever had the stuff before and I found it suuuper tasty, especially the naan. So when I was thinking about something to occupy my time in the kitchen this weekend, I thought about a chicken dish...and realized that no one real makes Indian food all that often, so why not give it a try.

Well both of these recipes had a ton of great reviews on Allrecipes.com, so with a few minor modifications based on positive reviews, I share with you the recipes I used to make this pretty delicious dish. Serve over any kind of rice and enjoy!


Now, I was pretty pleased with this meal, but it wasn't my absolute favorite. I could have done with a bit more spice and little less sweetness. I think coconut chicken curry is a pretty sweet dish in general though, so maybe next time I will try a different Indian recipe to get the flavor I want. Maybe what I am looking for is more along the lines of chicken tandoori? I'm not sure, but either way I'd definitely try more Indian recipes now that I have tried this out. While this wasn't my favorite meal I've made, I still enjoyed it...and Curtis said he really liked it a lot.

The nice thing about this recipe was that it was fairly easy and involved minimal ingredients for such a flavorful meal. With the time the curry needs to simmer and the naan needs to rise, it does involve a bit of time, but the good news is, if you time everything out you can move smoothly between each and have everything warm and ready all at once. I prepared the dough for the naan first and while I was waiting for it to rise the first time around, I prepared what I needed for the chicken dish. After preparing the naan for it's second rise, I started to cook the chicken. Once the chicken dish was simmering, I had time to get the rice boiling and cook the naan, keeping the naan warm in the oven at 200 degrees. 

Coconut Chicken Curry

Ingredients: 
  • 2 lbs. boneless, skinless, chicken breasts
  • salt and pepper to taste
  • 2 tbsp. vegetable oil
  • 2 tbsp. curry powder
  • 1/2 onion, sliced thinly
  • 2 cloves garlic, minced
  • 1 (14 oz.) can stewed, diced tomatoes
  • 1 (8 oz.) can tomato sauce
  • 1 (14 oz.) can coconut milk
  • 3 tbsp. sugar


Directions:
  1. Season chicken pieces with salt and pepper, as desired.
  2. On medium-high heat, heat oil and curry powder in large skillet for 5 minutes. 
  3. Stir in onions and garlic, continue to cook for 2 more minutes.
  4. Add chicken, tossing to evenly coat with curry oil. Reduce heat to  medium, and continue to cook for about 8 more minutes, or until chicken is cooked through. 
  5. Pour tomatoes, tomato sauce, coconut milk, and sugar into the pan. Stir thoroughly and cover. Allow to simmer for approximately 40 minutes, stirring occasionally.

Naan

Ingredients:
  • 2-1/4 tsp. active dry yeast (or one .25 oz. packet)
  • 1 c. warm water
  • 1 tbsp. + 2 tbsp. sugar
  • 3 tbsp. milk
  • 1 egg, beaten
  • 2 tsp. salt
  • 4 c. flour
  • 2 tsp. minced garlic
  • 1/4 c. butter, melted

Directions:
  1. In stand mixer, combine yeast, water, and 1 tablespoon of sugar. Let sit for 10 minutes or until mixture is frothy.
  2. Stir in 2 tablespoons sugar, milk, egg, and salt. Gradually add flour until dough comes together (this may not take all 4 cups).
  3. Knead on lightly floured surface for 6 to 8 minutes or until dough is smooth. 
  4. Place dough in oiled bowl, cover with damp cloth, and allow to rise for about 1 hour, or until dough has doubled in size.
  5. Punch dough down and pinch golf ball sized handfuls of dough and place on a tray. Cover with damp towel and allow to rise for about 30 minutes.
  6. Melt butter and mix with minced garlic.
  7. Roll dough into thin circles, brush tops with garlic butter.
  8. On medium to medium-high heat, heat iron skillet. Place naan, buttered side down on hot surface for approximately 30 to 60 seconds. Flip and allow to cook for an additional 30 to 60 seconds.
* Note: The original directions ask for the naan to be cooked on a grill at medium-high heat for about 2 minutes a side; however, the grill we have is pretty unpredictable (and it was cold), so I opted for the iron skillet option. My guess is that they would taste even better on the grill, but they still tasted great this way as well.

Thursday, October 31, 2013

(EASY) Boston Cream Pie Torte

I'm not quite sure where this recipe came from, but my mom has been making it for years, next to her always fantastic Dusty Dessert (which I'll have to post the recipe for sometime). This recipe is SO easy and so cheap to make. You can easily make it for under $8. It doesn't have to be baked, so you can whip this up in under 10 minutes for sure.

With the Red Sox win last night in the World Series, I made this dessert for Andy who eats, sleeps, and breathes Boston. My brother - who, again, doesn't like much - loves this dessert and gets it just about every year for his birthday from my mom.  So, that being said...everyone will be sure to love this dessert.


Ingredients:

  • Graham crackers (enough for two layers in a 9 x 13 pan)
  • (2) 3.25 oz. pkgs. instant vanilla pudding
  • 3-1/2 c. milk
  • 8 oz. container Cool Whip, thawed
  • 1 container chocolate frosting


Directions: 
  1. Line bottom of 9 x 13 pan with graham crackers.
  2. In bowl, mix together vanilla pudding mix and milk. (* Note: The recipe calls to mix only 3-1/2 cups milk...this is not the same as the directions on the pudding package...we want the batter to be thicker. Be sure to only add 3-1/2 cups.)
  3. Fold in Cool Whip and pour over graham crackers and smooth.
  4. Layer pudding layer with another layer of graham crackers.
  5. Carefully frost the top of the graham crackers.
  6. Chill in the refrigerator for a few hours before eating to allow the dessert to set a bit.

Tuesday, October 29, 2013

Carrot Cake [Cupcakes]

This recipe is by far one of my favorites recipes ever. I used to think that carrot cake was nothing special, but I guess I never really gave it a chance, cause this stuff is amazing. I hardly even want to give this recipe out - it's so good (thanks to Allrecipes.com) and I feel like I want to keep it a secret! Every time I make this, people really love it. And it's not even as complicated as people may think.


I took the original recipe on the website and sifted through hundreds of reviews to find the best alterations to make and I'll post what I think makes for the best cake. This cake is suuuper moist and really flavorful, but not in an overly sweet way. The first time I made this cake was for my mom's birthday. Even though we all know she love sweets (like the candy she hides in the bottom drawer of the kitchen), she isn't the biggest fan of cake (minus the frosting)...so this cake was perfect because clearly cream cheese frosting is amazing, and the cake is great because it's not a sugary, cake-y cake. It's just really good, okay?


And one of the great things about carrot cake is that you can enjoy it for dessert or even for breakfast (I think). DEEE-licious. 

Ingredients:

Cake:
  • 3 eggs
  • 3/4 c. buttermilk
  • 3/4 c. vegetable oil
  • 1-1/2 c. sugar
  • 2 tsp. vanilla
  • 2 tsp. ground cinnamon
  • 1/4 tsp. salt
  • 2 c. flour
  • 2 tsp. baking soda
  • 3 c. shredded carrots (* Note: Freshly shredded carrots are best, don't go out and buy the pre-shredded stuff in bags...your cake will not have the same degree of moistness.)
  • 1 c. flaked coconut
  • 1 (8 oz.) can crushed pineapple, with juice
  • Optional - 1 c. chopped walnuts
Frosting:
  • 2 (8 oz.) pkgs. cream cheese, softened
  • 1/2 c. butter, softened
  • 2 c. sifted powdered sugar, plus more as needed for desired consistency
  • 1 tsp. vanilla extract


Directions:
  1. Preheat oven to 350 degrees.
  2. If you are making a carrot CAKE, grease and flour two 9" round pans. If you are making CUPCAKES, prepare muffin tins with aluminum cupcake liners.
  3. In medium bowl, combine flour, baking soda, salt, and cinnamon. 
  4. In separate bowl, combine eggs, buttermilk, oil, sugar, and vanilla and mix well.
  5. Combine dry ingredients with wet ingredients and mix well.
  6. In medium bowl, combine shredded carrots, coconut, pineapple, and walnuts (if using). Then fold mixture thoroughly into cake batter.
  7. Pour batter into either the two 9" rounds or into the prepared muffin tins (filling about 3/4 of the liners).
  8. Baking time varies from cake to cake, so keep a close eye on these. DO NOT LET THEM BURN. In my experience, I have baked CAKES for 45 minutes to 1 hour, or until cake springs back at the touch or inserted toothpick comes out clean. For CUPCAKES, bake for 25-35 minutes.
  9. Allow to cool completely before frosting. 
  10. To make frosting, cream together cream cheese and butter until creamy. Mix in vanilla and gradually stir in powdered sugar until desired consistency has been reached.
  11. Store cakes in refrigerator after preparation.

Wednesday, October 23, 2013

Reese's Peanut Butter Cup Rice Krispie Treats

Peanut butter = my favorite thing. Ever.

Clearly I've said this before.

What I may not have mentioned is the fact that I also LOVE Rice Krispie Treats...only the homemade kind though...none of that store-bought junk. Come on...they do NOT taste the same. I remember back in high school...me and Ericka would eat an entire pan of plain Rice Krispie Treats in one sitting. I tried to convince myself that we were taking the healthy route by not adding as much butter; however, we just compensated for that loss by adding twice as many marshmallows. Whoops.

So these things are even better than plain Rice Krispie Treats...or Scotcharoos (even though traditional Scotcharoos are pretty killer). But come on, who can say they don't like a Reese's Peanut Butter Cup? These things are loaded with pieces of peanut buttery and chocolaty goodness that is THE Reese's. They are pretty rich, but after one bar, they still leave you wanting another...or three.


Ingredients:
  • 6 c. Cocoa Krispies cereal
  • 18 Reese's Peanut Butter Cups, chopped into pieces
  • 5 tbsp. butter
  • 3 tbsp. corn syrup
  • 1 (10 oz.) bag mini marshmallows, plus 2 c.
  • 1/2 c. peanut butter
  • 1/2 c. chocolate chips
 
Directions:
  1. Chop Reese's Peanut Butter Cups into pieces, store in fridge or freezer for a few minutes as you prepare the rest of the ingredients. This will help the pieces not melt as quickly later on.
  2. Spray 9x13 pan with non-stick spray.
  3. Pour Cocoa Krispies into large bowl, add chilled Reese's, and gently mix.
  4. Melt butter in medium pan. Then add corn syrup and marshmallows, stirring continuously over low heat until smooth.
  5. Pour melted marshmallow mixture over cereal and Reese's. Gently fold together until marshmallows are incorporated.
  6. Press mixture into 9x13 pan.
  7. In microwave-safe bowl, microwave peanut butter for 30 second intervals until melted.
  8. Again, in microwave-safe bowl, microwave chocolate chops for 30 second intervals until melted.
  9. Drizzle peanut butter and chocolate chips over the top.
  10. Chill in fridge until chocolate and peanut butter has set. Then cut into squares.

Super Sloppy Joe's

So when I was in elementary school at good old Jackson Elementary, I remember that each and every picture day they would serve Sloppy Joe's for lunch. What kind of terrible joke is that? Sloppy Joe's... There's MESS written in the name? And little kids? Meat on their faces, meat on their clothes... I'm sure my mom was thrilled. And I'm sure whoever was making lunch menu decisions was snickering as picture day came around every year. Just had to share that story since today's recipe is for these sloppy, but delicious sandwiches.

Here's a recipe I found and modified a little bit from Allrecipes.com. Man food. Also an easy recipe for when ground beef is on sale and you have to do something with it. This also freezes very well.

Yum.


Ingredients:

  • 1 lb. ground beef
  • 1/4 c. chopped onion
  • 1/2 tsp. garlic (* Note: I used the minced kind you can buy in a jar, but fresh garlic or garlic powder will work as well.)
  • 1 tsp. yellow mustard
  • 1/2 c. ketchup
  • 1/4 c. barbecue sauce
  • 3 tsp. brown sugar
  • salt and pepper to taste

Directions: 
  1. In medium pan, over medium heat, brown the ground beef, onion, and garlic. Drain any liquids.
  2. Stir in mustard, ketchup, and barbecue sauce and mix thoroughly.
  3. Reduce heat and let simmer for 30 minutes and season with salt and pepper as desired.

Tuesday, October 22, 2013

Apple Brownies

Just in case you were wondering, the answer is NO. You cannot have too many apple desserts. It's fall...and they're gonna keep on coming. 

This was a recipe I found on Pinterest, and I really only made them so that I could use up some of the apples that I got from Curtis's mom, but they really actually turned out to be very good! I even made them a while back and stuck them in the freezer for a couple of weeks since I had WAY too many desserts going on (typical). Just this past weekend I took them out of the freezer to bring on a trip and they turned out much, much better than I had expected them too. They were suuuper moist and full of apple flavor.  So, lessons learned - don't underestimate any recipe and hey, these things freeze well.


I will say this too: usually I enjoy my apple desserts warm from the oven or nuked in the microwave, but I thought these tasted better at room temperature. I bet it would be fantastic with ice cream piled on top...but man, even plain I loved these things.

Ingredients:
  • 1 c. unsalted butter, room temperature
  • 2 c. sugar
  • 2 eggs
  • 1/2 c. milk
  • 1 tsp. vanilla
  • 2 c. flour
  • 1 tsp. baking powder
  • 1/2 tsp. salt
  • 2 tsp. ground cinnamon
  • 4 small apples, peeled and diced (approximately 3 c.)

Directions:

  1. Preheat oven to 350 degrees.
  2. Prepare 9x13 baking pan with non-stick spray.
  3. Cream together the butter and sugar with hand-mixer for about 2 minutes until fluffy.
  4. Add the eggs, one at a time, mixing after each addition. Add the milk and vanilla and mix again.
  5. In a separate bowl, combine the flour, baking powder, salt, and cinnamon. 
  6. Add the dry ingredients to the wet ingredients and stir to combine.
  7. Add diced apples and mix well.
  8. Spread batter into the prepared baking dish and bake for 45 minutes or until a toothpick comes out clean.

Thursday, October 17, 2013

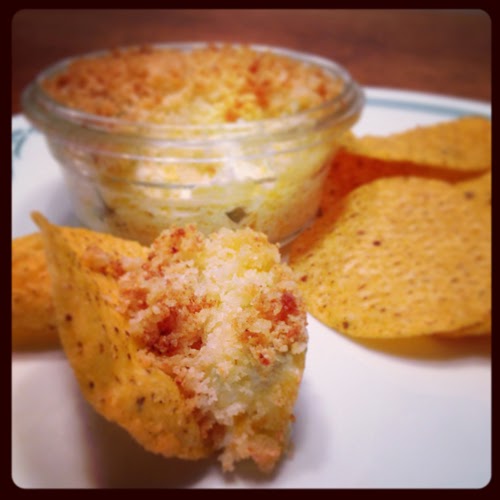
Jalapeno Popper Dip

Most addicting dip ever. 

This stuff is so good. I'm not a fan of suuuper spicy things, but the creaminess of the cheese paired with the spiciness of the peppers makes for a really delicious snack.

SO, in lieu of football season, here is the perfect chip/cracker/pretzel dip. It's better than the real things if you ask me. You'll be so busy watching the game that before you know it, you'll look down and notice half the pan is gone. 

Enjoy!


Ingredients:
  • 2 (8 oz.) pkgs. cream cheese, softened
  • 1 c. mayonnaise
  • 1 c. cheddar cheese, grated
  • 5 or 6 jalapeno peppers, minced
  • 1 poblano pepper, minced
  • 1 tbsp. olive oil
  • 1 c. Panko bread crumbs
  • 1/2 c. Parmesan cheese
  • 1/4 c. butter, melted
(* Note: You COULD try to "healthatize" this recipe by using Miracle Whip instead of Mayo or by using Greek Yogurt instead of Mayo, but let's be real...it's gonna taste better if you use all real ingredients. I used the 1/3 less fat cream cheese, but that's where I draw the line.)

Directions:
  1. Preheat oven to 350 degrees.
  2. When mincing the jalapeno peppers, you don't need to worry about de-seeding them. Just quarter them lengthwise and continue to mince. Obviously for the poblano pepper, you'll want to remove the guts.
  3. In a skillet, saute peppers in 1 tablespoon of olive oil over medium heat for about 3 to 4 minutes.
  4. In bowl, combine peppers with cream cheese, mayonnaise, and cheddar cheese. 
  5. Prepare medium-sized baking dish by buttering the sides so the dip doesn't stick too badly. Then transfer the cheese mixture to the dish.
  6. For the topping, combine the bread crumbs, Parmesan cheese, and melted butter and sprinkle on top of the dip.
  7. Bake for 25-30 minutes or until the top is golden brown.

Pull-Apart Cinnamon Roll Bread

This bread. Although it was incredibly putzy, was so worth it. I've been eyeing this recipe up for a while on Pinterest and finally decided that it had to be done. 


When I say that this recipe was putzy, I really just mean that from start to finish was kind of a long time, but half of that time is rising/baking time. It was actually pretty easy. The dough came together great and rose as it was supposed to (so that's always good).

The hardest part was cutting the roll of prepared dough into slices. But I have explained before under Ooey Gooey Cinnamon Rolls how to do this easier with either thread or dental floss. Cutting and rolling the dough into thin slices, sandwiched with more butter and more filling, makes this bread awesome because the whole loaf is like the center of a cinnamon roll - which is the best part (obviously).

So even though this recipe took some time...and patience...to make. I think I'll definitely make it again soon.


Ingredients:

Dough:
  • 2-3/4 c. flour
  • 2 tbsp. cornstartch
  • 3/4 tsp. salt
  • 2-1/4 tsp. active yeast
  • 1/4 c. sugar
  • 1/3 c. milk
  • 1/4 butter
  • 1/4 c. water
  • 2 eggs
  • 1 tsp. vanilla
Filling:
  • 2/3 c. brown sugar
  • 2 tbsp. cinnamon
  • 1 tsp. cornstarch
  • 1/4 c. butter, melted
Glaze:
  • 2 tbsp. butter, melted
  • 3/4 c. powdered sugar
  • 1/2 tsp. vanilla
  • hot water

Directions:
  1. In mixing bowl, combine 2 cups of flour, cornstarch, salt, yeast, and sugar.
  2. In saucepan, heat butter and milk until butter is melted. Remove from heat and add water. Let stand for about one minute, then add vanilla.
  3. Stir liquid mixture into dry mixture until just combined.
  4. Turn mixture on low speed and add the eggs one at a time until just combined.
  5. Add 1/2 a cup of flour to the mixture. Mix on low speed for about 1 minute.
  6. Add 2 more tablespoons of flour and mix on medium speed for about 45 seconds until smooth and sticky. 
  7. On work surface, sprinkle 2 tablespoons of flour and knead dough until it's not as sticky (about 1 minute).
  8. Place the dough in a well oiled bowl, cover with damp cloth, and place in warm place to let it rise until double in size (about 1 hour). 
  9. While dough rises, combine brown sugar, cinnamon, and cornstarch.
  10. Once the dough is ready, dump dough onto flour surfaced and roll into a 15" x 15" square. 
  11. Brush 3/4 of the butter onto dough and sprinkle with 3/4 of filling. Then roll dough tightly into a log. 
  12. Slice roll into about 20 to 25 slices. and place onto wax paper. (* Note: I like to use the same method I described in the cinnamon roll recipe. That is, using a piece of thread or dental floss, to basically tie a knot over the dough and cut into slices. This makes for a much cleaner cut than using a knife.)
  13. Roll slices until thin (about 1/8" thick) and brush each slice with remaining butter and sprinkle with remaining filling. 
  14. Make about 4 stacks of dough, about 5 stacks high. 
  15. Grease 9x13 baking pan. Place dough stacks into pan. Cover with damp cloth and allow dough to rise in a warm place for 30 minutes.
  16. Preheat the oven to 350 degrees.
  17. Bake bread for 25 to 35 minutes. Let bread cool in pan for 15 minutes.
  18. Meanwhile, combine melted butter, powdered sugar, and vanilla and mix with hot water until slightly runny.
  19. Run a butter knife around bread and gently remove from pan and transfer to a wire rack and brush with glaze.

Monday, October 14, 2013

Buttermilk Cheddar Biscuits

Biscuits. Who doesn't love a good, flakey, buttery biscuit. These things are killer. Sarah and Russ made these one day for a little breakfast party we had at work for my boss and everyone LOVED them. I kept going back for more...so I had to get the recipe.

The recipe is an Ina Garten recipe from FoodNetwork.com. She's a smart lady.


The great thing about these biscuits is the fact that they don't come from a mix and they are still so easy. They are crispy on the outside and soft on the inside. They taste best when you nuke them in the microwave for a few seconds. The cheese melts a little bit and they are super good.

I bet these would be good with BACON.

That's happening.

Ingredients:
  • 2 c. flour (more as needed)
  • 1 tbsp. baking powder
  • 1-1/2 tsp. salt
  • 1-1/2 sticks cold unsalted butter, diced
  • 1/2 c. buttermilk
  • 1 egg
  • 1 c. grated extra-sharp Cheddar
  • 1 egg, beaten with 1 tbsp. water or milk
  • Sea salt (optional)
Directions:
  1. Preheat oven to 425 degrees.
  2. Combine flour, baking powder, and salt. Add butter and use pastry cutter until mixture is crumbly.
  3. Combine buttermilk and egg and beat lightly with fork.
  4. Mix with flour and butter mixture until just combined.
  5. In bowl, mix grated cheese with a small handful of flour until coated, then add to dough mixture until roughly combined.
  6. Dump onto well-floured surface and knead about 6 times. Roll dough into 10x5 rectangle and divide with knife into 8 pieces.
  7. Transfer to baking sheet lined with parchment paper and brush tops of biscuits with egg wash. Sprinkle with sea salt.
  8. Bake for 20-25 minutes until tops are golden brown.


Friday, October 11, 2013

Chocolate Malt Cookies

Curtis's dad loves malts. Like, really loves malts. I'm pretty sure there's always a bucket of ice cream in the freezer and malted milk in the cupboards at the Ryan household. 

So I've made him some malted milk cookies before, but I have to say that recipe didn't turn out as good as this one did. They tasted really good, but they were a little on the soft-side. SO, these ones I think turned out a bit better. And they were quick!

Next time I make these, though...I think I might try putting chunks of malted milk balls in the batter instead of chocolate chips. Sounds good to me!


Ingredients:
  • 1 c. butter-flavored Crisco
  • 1-1/4 c. brown sugar
  • 1/2 c. malted milk powder
  • 2 tbsp. chocolate syrup
  • 1 tbsp. vanilla
  • 1 egg
  • 2 c. flour
  • 1 tsp. baking soda
  • 1/2 tsp. salt
  • 2 c. milk chocolate chips

Directions
  1. Preheat oven to 375 degrees.
  2. In large bowl, combine Crisco, brown sugar, malted milk powder, chocolate syrup, and vanilla. Beat well for approximately 2 minutes.
  3. Add the egg.
  4. In separate bowl, combine flour, baking soda, and salt. Gradually add the dry ingredients to the wet ingredients, mixing well after each addition.
  5. Fold in chocolate chips.
  6. Shape into balls and place on baking sheet. Bake for 11 minutes. Allow cookies to cool on baking sheet for 2 minutes before transferring to wire racks to cool completely.

Thursday, October 10, 2013

Almond Joy Brownie Bites

Okay, let's be real... These are anything but a "bite" (unless you're Curtis Ryan), but they are so rich and so delicious that it's more than just a pop-in-your mouth-and-go type of thing...and that's OK by me...cause I like to savor my desserts. 

So first off, these should probably be called "Good Enough for John Cabaj Bars" instead because there is only a short list of things my brother likes when it comes to dessert, given that fact that he doesn't like cheese (I know, it's weird). So anyway, these are JC-approved, which has gotta mean something.


John's favorite candy bar is the Almond Joy, so for his birthday I was on the hunt for a recipe that would be just as yummy as the candy. Now, I also love coconut (and chocolate)...and so does my mom, so this recipe was a real winner in my book.

...that is...besides the fact that it destroyed my muffin tins (temporarily). This really great recipe comes along with a few lessons learned; which are as follows:

  • Use the extra-large cupcake liners and make sure they are aluminum! I used the regular-sized aluminum cupcake liners, so if you use the regular size paper cupcake liners, you'll fail doubly. So use these. Yeah, see...they say "Jumbo" on the package...you'll thank me later.
  • If the coconut mixture looks too thin, add more coconut. While the sweetened condensed milk infused brownies ARE fantastic, bubbling-over sweetened condensed milk is not (see below).

Okay, now that I've probably scared you enough to not make these, let me say...that these are amazing. I promise. They are worth the time and effort... Even IF you need to spend hours cleaning muffin pans after the fact. I've provided you with solutions to all the problems anyways, and look how pretty they turned out in the end!


Ingredients:
  • 1 "Family Size" box chocolate fudge brownie mix (+ everything you need to prepare)
  • 1 (14 oz.) can sweetened condensed milk
  • 1 (14 oz.) bag coconut
  • 1/4 c. milk
  • 1-2 c. chocolate chips
  • 1/2 c. slivered almonds, slightly crushed

Directions
  1. Preheat oven to 350 degrees.
  2. Line 2 muffin tins with extra large aluminum liners.
  3. Prepare brownie mix according to the directions on the box and fill liners halfway.
  4. Bake in preheated oven for 12 minutes.
  5. Meanwhile, mix coconut, sweetened condensed milk, and milk.
  6. Remove brownies from oven and spoon coconut on top. 
  7. Place back in the oven and continue to bake for an additional 14 minutes.
  8. Remove from oven and allow brownies to cool completely. (* Note: I actually chilled these overnight in the fridge.)
  9. Remove brownies from liners and place on waxed paper.
  10. Toast almonds by heating in sauce pan over medium heat, stirring often. Heat until golden brown. Set aside.
  11. For chocolate drizzle, melt chocolate chips in microwave by heating at 50% power, mixing every 30 seconds so the chocolate doesn't burn. 
  12. Drizzle chocolate over cooled brownies and top with almond pieces.
  13. Store in refrigerator.

Monday, October 7, 2013

Better Than Cracker Jack

So it's a little early for holiday popcorn, but this stuff is so good. I love popcorn in general, but when you mix it with peanuts and caramely topping, it's even better. 

The crazy thing about this recipe is that the popcorn actually stays crunchy. I couldn't believe it. You'd think that pouring buttery, caramely sauce over light and fluffy popcorn that you'd end up with a soggy mess, but NO. This stuff is fantastic. As it's cooling on the waxed paper, you can actually hear it cracking.

I made a double batch of this stuff last Christmas and I am pretty sure that both of them were gone within a day. 

So make it. You won't regret it. Well, you might after you eat entire bag in one sitting, but don't worry. I'm sure you'll get over it. 


Ingredients:
  • 7 quarts plain popped yellow popcorn
  • 2 c. dry roasted peanuts
  • 2 c. brown sugar
  • 1/2 c. light corn syrup
  • 1 tsp. salt
  • 1 c. margarine
  • 1/2 tsp. baking soda
  • 1 tsp. vanilla

Directions
  1. Preheat oven to 250 degrees.
  2. Combine popped popcorn and peanuts in large roasting pan.
  3. In saucepan, combine brown sugar, corn syrup, margarine, and salt. Stir to blend and bring to a boil over medium heat. Once the mixture begins to boil, boil for 5 minutes, stirring constantly.
  4. Remove from heat, and stir in baking soda and vanilla. The mixture should look slightly foamy.
  5. Pour liquid over popcorn mixture and stir to coat as evenly as possible.
  6. Bake for 1 hour, thoroughly stirring every 15 minutes. 
  7. Allow popcorn to cool completely on waxed paper. Separate chunks into pieces if need be.

Saturday, October 5, 2013

Hazelnut Cream Cheese Frosted [Chocolate Chip Pumpkin Cupcakes]

The cupcakes continue. My favorite.

These use the same recipe I posted earlier for Chocolate Chip Pumpkin Bread, with the added deliciousness of Hazelnut Frosting. More fall for your mouth.


So, use the recipe I posted earlier for the bread and divide evenly into about 18 cupcake liners instead. You'll want to bake these for about 20 minutes, but keep a close eye on them cause they seem to finish fairly quickly. So take them out when the tops are springy to the touch. 

And then top with this easy frosting recipe...

OH, I wish fall never had to end.

Ingredients:
  • 2 (8 oz.) packages of cream cheese
  • 1/2 c. butter
  • 1-1/2 tsp. hazelnut extract
  • 2 c. sifted powdered sugar

Directions: 
  1. Cream together cream cheese and butter.
  2. Add hazelnut extract.
  3. Slowly add powdered sugar.
(* Note: Be sure to store left-over frosting and cupcakes in the refrigerator.)

Thursday, October 3, 2013

My Favorite [Chicken] Pot Pie

It's getting colder out and it seems to be the season of endless pies. So here it is. Probably one of my all-time favorite recipes...

The Chicken Pot Pie.

Nothing like a hearty, warm meal for fall or winter. Chicken, potatoes, a good mix of veggies, warm gravy, and a flaky pie crust? What's not to like? You can eat this the day of, or store in the fridge or freezer. It reheats well.


So, I love chicken, but I am wondering what this pot pie might be like if it was made the vegetarian way (ahem, Kathy and Alex). I'm not quite sure what you'd add as an alternative to the chicken. Maybe just more vegetables and potatoes? Some Tofurkey? Mushrooms? Heck, you can realistically add anything you want, as long as the sauce-to-solids ratio is about the same. And instead of using chicken broth, you'd clearly just use vegetable broth and nix the poultry seasoning. I think I'd enjoy this dish vegetarian or non-vegetarian. Maybe I'll just start stuffing everything I eat into a pie crust. MMM.


Rotisserie chicken may also be a good thing to use next time as well.

Oh man, my next chicken pot pie is going to be fantastic.

Ingredients:
  • 1 lb. boneless, skinless chicken breast (cubed) 
  • 1 bag frozen vegetable medley
  • 1/2 c. diced celery
  • 1 c. cubed potatoes
  • 2/3 c. butter
  • 2/3 c. diced onion
  • 2/3 c. flour
  • 1 tsp. salt
  • 1/2 tsp. pepper
  • 1/2 tsp. celery seed
  • 1/2 tsp. garlic powder
  • 1 tsp. poultry seasoning
  • 2 (14 oz.) cans chicken broth
  • 1 c. milk
  • 2 servings of Chris Ryan's Never Fail Pie Crust
  • 1 egg + 1 tbsp. water for egg wash

Directions: 
  1. Preheat oven to 375 degrees.
  2. In large pot, combine chicken, vegetable medley, celery, and potatoes. Add water to cover and bring to a boil. Reduce heat and let simmer for 15 minutes. Remove and drain. 
  3. In large pot, cook onions with butter over medium heat until soft and translucent. 
  4. In small bowl, combine flour, salt, pepper, celery seed, garlic powder, and poultry seasoning. Whisk dry mixture into the onions and butter. 
  5. Slowly add chicken broth and milk and simmer until thick.
  6. Add chicken mixture to dish prepared with pie crust (* Note: This can be either a 9" round, 8"x8", or something similar. It does help if the dish is a bit deeper just so you know there will be no spill-over.)
  7. Pour sauce over chicken mixture.
  8. Top with second crust. Seal and brush with egg wash. Be sure to cut slits in the top to allow air to escape.